I built this because our new home has a number of pinging ducts and I wanted to get to the bottom of it. So I decided to build something that could ‘hear’ through walls and display the number on a screen. In theory, this should allow me to pinpoint exactly where sounds might be located.
I had a few components at my fingertips, one of them being the Sparkfun Microview which I might have even obtained way back when they had their Kickstarter campaign. I had built a pretty sweet magnet detector with them, so a sound detector should be relatively the same level of difficulty.

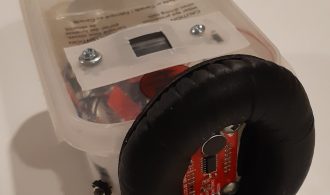
I ordered the Sparkfun sound detector and hooked up all the components (the code below has some notes around that). Because reading the slider numbers were kind of tricky, I created a delay for displaying the current sound level. More useful is the “max” sound which shows quick peaks. In order to reset the maximum sound, I just installed a power button.
/* Code from Sparkfun sound detector and Microview hookup guide
 * Connections:
 * The Sound Detector is connected to the Microview as follows:
 * (Sound Detector -> Arduino pin)
 * GND ? GND
 * VCC ? 5V
 * Gate ? Pin 1
 * Envelope ? A0
 *
 * Additional library requirements: none, except Microview
 */
#include <MicroView.h>
MicroViewWidget *widget_max, *widget_snd; //declares a widget class which is the slider

//sound variables
int snd = 0; //this is the read of the sound
int snd_max = 0; /// this is useful in case of fast, sudden ticks

/// inputs to Microview
#define PIN_ANALOG_IN A0
#define PIN_GATE_IN 1 // different than sample code https://learn.sparkfun.com/tutorials/sound-detector-hookup-guide

int counter = 0; ///use this to create a display in reading. why not use delay() function ? Because you want to update 'snd_max' as much as possible

void setup()
{
  Serial.begin(9600); // I only kept this for troubleshooting
  Serial.println("Initialized"); // again, not really needed
  uView.begin();
  uView.clear(PAGE);
  widget_snd = new MicroViewSlider(0,5,0,1024, WIDGETSTYLE1);//15, 0 is the location, 0, 255 is the slider number
  widget_max = new MicroViewSlider(0,30,0,1024, WIDGETSTYLE1+WIDGETNOVALUE);//50, 0 is the location, 0, 255 is the slider number
// I have the WIDGETNOVALUE because I have special max text with labels (see further down)
}

void loop()
{
  snd = analogRead(PIN_ANALOG_IN);
  counter++ ; ///once this gets up to a certain amount, then update the main slider viz
  Serial.println(counter);
  if(counter >= 90){
      widget_snd->setValue(snd);  //top slider
      counter = 0; // reset counter
  }
  // this next section sets the sound max (bottom) slider
  if(snd > snd_max){snd_max = snd;}
  widget_max->setValue(snd_max);
  // this next section is just to make sure what is max and what is not is visible
  uView.setCursor(10,40);
  char max_text[10];
  sprintf(max_text,"max: %d", snd_max);
  uView.print(max_text);
  uView.display();
  delay(10);
}
The assembly used a headphone cover in order to insulate against outside sounds and I could then hold it up against a wall/floor/ceiling. I didn’t have a nice project box that let me look inside, so I used an old plastic box that used to hold nails in it. The advantage is the plastic is soft enough to cut or drill easily and is the right size. It also felt pretty DIY punk rock.

Some minor headaches is that the Microview doesn’t have the pin numbers on it, probably for aesthetic reasons. So you keep having to refer to a diagram, which I printed up an posted on a wall. For troubleshooting, you have to disconnect the whole thing and then reconnect it. Because of that, I would say that Microview is great, but not the first hobby micro-controller you ever want to use. I think they are so cute and otherwise easy to use, though, that I feel like the challenges are worth it.